After working on cleaning the Ebay Keen-Eye boudoir doll, I felt like making an art-boudoir doll of my own. So here is a work-in-progress shot; I am trying fabrics on her, to see how she does with either pink and old lace, or blue satin with red polyester lace that I have a lot of.
It's great fun to try the fabrics with the doll at this stage and see how they match with the doll's expression.
One thing I do that really helps with sculpting, is I tilt the doll head under a bright light, and see how the shadows form as I tilt the head downward. If the shadows fall evenly, I know I have an even sculpt. I will illustrate it in a future post, but basically I look at the shadows and see if they are even, at each stage while I tilt the doll head.
So with this doll I like her now, I think; just a little bit of sanding to do. Have to decide on which fabric.

Vintage-Inspired Dolls and Art Dolls by J. Ann Firth
Sunday, December 28, 2014


Monday, November 10, 2014
A Workshop with Judy Barclift
I belong to a doll group which last month, hosted a workshop given by Judy Barclift, who is a fabulous California sculptor. She sculpts in a way that is very realistic, yet has her trademark style as well. She gave the workshop using polymer clay, which I hadn't tried sculpting a face in yet. The workshop was to make a "Jack on a Stick," a pumpkin or decorative squash head for Hallowe'en. The class was fun and we learned a lot. While my own sculpting does not approach hers, I still was pleased to get a pumpkin character, whom I thought looked French. I added some of my own trims, and found that I had sculpted.... a French onion seller!


He is a dapper older gentleman who
sells onions in the french countryside.
Ah yes, we had many good times togethair.......


And here he is, relaxing back at home.
Vintage Compacts - Reflections of History
I recently got involved with collecting vintage ladies' compacts. It is kind of a fascinating hobby, because they are like bits of history in your hand. There is the influence of style, and advances in American manufacturing are reflected in each decade's worth of compacts.
I never really thought about compacts, or even makeup much, until this summer. Maybe the boudoir doll got me interested in them somehow... it was her influence.

Here is a Thirties vanity I am starting to arrange, with two bullet boudoir lamps and some vintage enamel compacts... plus, movie star pictures and the head of the boudoir doll, looming on the right in the background.
Here are some Seventies and Sixties compacts I purchased and cleaned last week:

They harbored fifty year-old powder...which I have no intention of wearing, smelling or breathing. I always wear a respirator when I work on cleaning out compacts. I also wear cheap latex gloves, and plastic goggles, and throw my clothing in the washing machine afterward. AND take a shower.
The way I clean out pressed powder compact such as these is: I use a bent-out end of a heavy duty paper clip to push the powder cake pan out of the compact - there is a little hole on the back of the compact, where you can insert a paper clip wire or some other thick wire to push it out. Then I put the powder pan inside a thicker-type clear plastic bag, such as a freezer bag. Keeping the bag as closed as I can, to control the powder, I reach inside the bag with a stick or paintbrush end, and start pressing down on the powder until it breaks up. The powder breaks up under pressure, but it is under control because I am breaking it up inside the bag. I turn the pan over to dump powder into the bag, take the pan out and put it into another bag I have ready, and ziplock shut the first bag.
The way I clean out pressed powder compact such as these is: I use a bent-out end of a heavy duty paper clip to push the powder cake pan out of the compact - there is a little hole on the back of the compact, where you can insert a paper clip wire or some other thick wire to push it out. Then I put the powder pan inside a thicker-type clear plastic bag, such as a freezer bag. Keeping the bag as closed as I can, to control the powder, I reach inside the bag with a stick or paintbrush end, and start pressing down on the powder until it breaks up. The powder breaks up under pressure, but it is under control because I am breaking it up inside the bag. I turn the pan over to dump powder into the bag, take the pan out and put it into another bag I have ready, and ziplock shut the first bag.

Then with most of the powder gone, I clean the pan more, wiping it off several times with 7th generation cleaner or some kind of mild cleaner. Then the pan can be put back in the compact, which has been wiped with the spray cleaner. I never have problems with a mild cleaner discoloring the plastic. Sometimes if there is a lingering perfumey odor from the powder, I put the compact in hot sun in the backyard to bake off the odor. That works sometimes to take the smell away.
Tuesday, September 23, 2014
Boudoir Doll Progress
Yesterday I had the gumption, (I wonder where does that word come from?) to get out the box in the garage that contains the Boudoir doll that I bought on Ebay last year. After buying her, I had cleaned her dress and petticoats, and then stored her away for later.
I think she is a "Keen-Eye," from maybe the late Thirties, based on my readings of these dolls.

I sat her outside, and started in on cleaning her with Seventh Generation Natural All Purpose cleaner. It is a nontoxic eco-friendly cleaner; and more to protect myself from the doll itself than the cleaner, I wore a respirator, eye protection, gloves and a shower cap! Can't be too careful around dust!
The reason for this is because she was stuffed with kapok, which has in eighty years, turned to very fine dusty sawdust. Kapok dust exudes when you squeeze the doll, and is all over your hands when you handle it. Hack, cough.
Even though I think dolls should be preserved in as original condition as possible, it would be impossible to have this doll, as is, in one's environment.
Even though I think dolls should be preserved in as original condition as possible, it would be impossible to have this doll, as is, in one's environment.
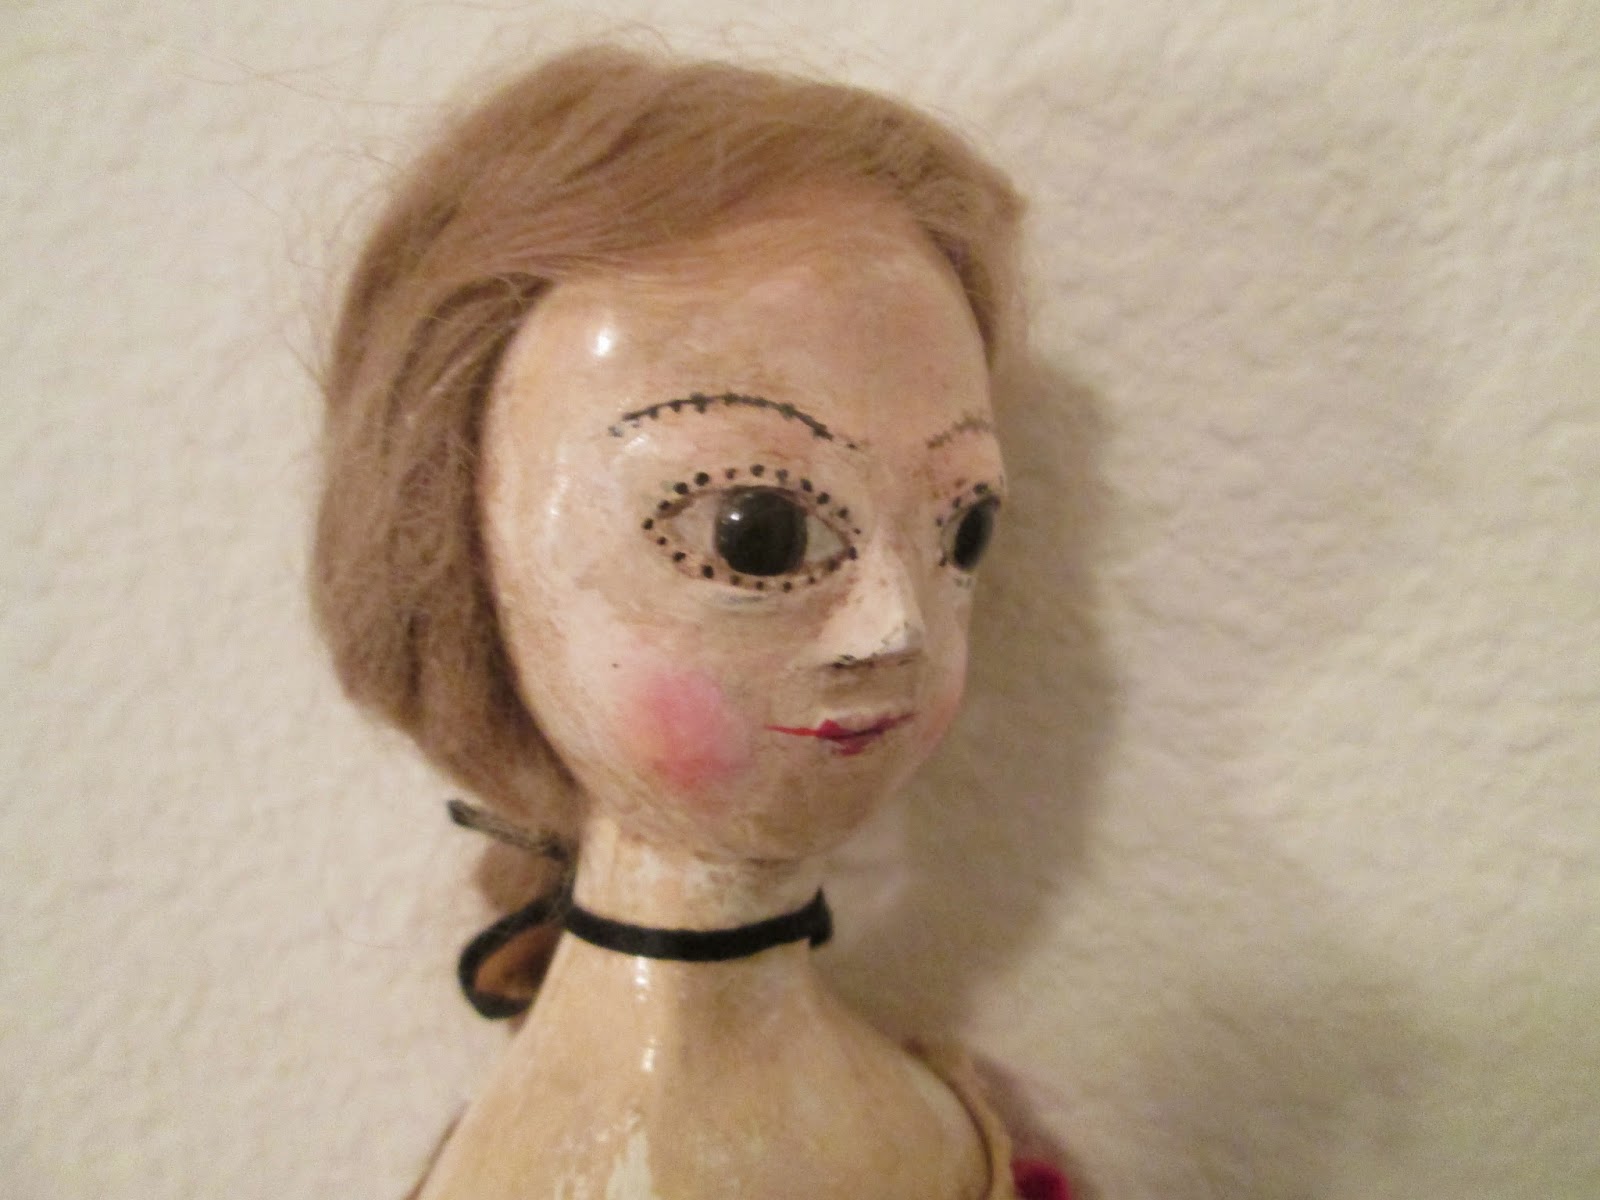
So I donned my garb and tried cleaning the back of one of her boots. When I saw the cleaner worked well and did not strip the paint whatsoever, then I used it on the arm, then boldy used it on the face. I sprayed it onto the tissue first and then rubbed giving it some elbow grease.

Her face before cleaning

After cleaning.
So, it looks like Seventh Generation cleaner works, for cleaning this type of doll.....
I really must paint her lips, they are distressing....
I really must paint her lips, they are distressing....
Part Two.
After that, I cut off her arms and legs, and simply pulled her head off her body easily; the glue attaching it was dried out. I decided I didn't want any more dust kapok, I can make her a new body. I traced her body onto pattern paper, and made note of how her legs and arms are to be attached:


1. The leg has a shallow top rim. 2. put the fabric leg upside down and the leg up inside it (see-through view)
3. put wire over the top of the fabric, securing it onto the leg rim. 4. Pull the fabric leg up the right way, to hide the rim and the wire. 5. Stuff.
You could also put a plug of wool in there before you pull the cloth leg up, as in 3. This keeps stuffing from going down into the leg, because it is hollow, and stabilizes it.
Well, that was some good progress, and now the next step is to find some eye-lash bristles, and touch up her paint.
Sunday, August 17, 2014
Varnish Thoughts
I really have some trouble figuring out what to use for varnish, if any. It's the final step, and it's the moment when you say, do I want to risk all the work I did on this doll face. Do I dare maybe wrecking my work.
Matte is flat, and I do enjoy seeing a little gleam on the cheek of a doll. I suppose I should just let them be matte and flat. They mostly pre-date varnish.
I recently worked some more on this Queen Anne-style doll of mine and then varnished it. I think I was telling myself, "this doll is finished. Now varnish it." But now she's pretty shiny.


I know I could put matte over the satin varnish in spots, I have done that before to tone down shine. I just wish I could find a finish with an even, somewhat dull shine..... like dolls of yore. I am thinking if she is paperclay trying to look like wood, wax is the answer. I must try wax over paperclay.
Thanks for looking and I hope you have a great day.
Wednesday, July 16, 2014
My Lisa Lichtenfels "Elder" Doll
I recently took Lisa Lichtenfels' four-day nylon-sculpting class -- she is known for her incredibly realistic nylon sculpting.
First, she taught us how to nylon-sculpt a doll head. Lisa had set the eyes to begin with, and I went from there, sculpting the facial features with curved needles. Then she taught us how to constuct the body armature, and build up the body to the point of being covered with nylon, all the while going for a realistic look. Then we each dressed our dolls in fabrics we chose. I used my own clothing pattern and her slippers pattern.
Lisa is a great teacher, well organized and also relaxed. She took time to go around and work with each student, several times during the course. It was great fun to meet her. She has entertaining tales of working as an artist in New York.


My doll is sewing on pieces for a quilt. I have fond memories of my grandmother working on her quilts. I would sit near her on the windowseat and we would talk. The cat and the dog were also there, at opposite ends.
A Bridal Hollyhock
It's called Bride's Bouquet. About 2 1/2 inch blooms in diameter.


We keep looking at it all day! So pretty!
Getting Around to the Moth Doll
I finally finished my art-doll, "Virginia Moth." Or, I could call her "Madama Moth." I started her as a bottle doll (see earlier posts), but then totally changed the idea to this! I made her for my local doll group challenge of "Flight."


I gave her a loop so she can hang out on the wall.... before she descends onto her next natural-fiber piece of clothing in the closet... :(
Although I started out thinking she would be made of all-natural-fiber material, I had this piece of polyester cafe-colored fabric I liked. I first started chopping it up for moth wings for the moths that are adorning her.
I decided to give her sort of kimono sleeves, and round "moth-eye" patches on each sleeve. She has only short wire arms and small wire legs, wrapped with cotton, under her costume, but her body is full and soft (moths have thicker bodies than butterflies) and is made of cotton on a wire armature.
It's a stretchy fabric, but it almost evokes lace, or trapunto. It drapes well, so I decided I didn't want to hack it into little bits, I wanted her to wear it.
Continuing onward, I gave her a thick, tattered, velvet shawl, which I think is a polyester velvet. It had good fraying at the edges, and so she can sit wrapped in it; and it the texture goes with her dress.
So, I went from thinking in terms of little frayed pieces, to larger draped ones, and I like the feeling of the doll the better for it. I drew kind of a boudoir face, thinking she should have large "moth-like" eyelashes and eyes.
She has a big seam down the front of her face, but I left it there and didn't cover it with a "cloth-over." Because she's a little weird. She's a moth....the seam adds to the weirdness.
She has a big seam down the front of her face, but I left it there and didn't cover it with a "cloth-over." Because she's a little weird. She's a moth....the seam adds to the weirdness.
I hope you like my "moth doll." She was my little moth adventure.
Tuesday, June 10, 2014
Old Yeller
When I saw that Gail Wilson carries a special paint to make white fabrics look yellowed with age, I thought ah, now we are getting to the nitty gritty! Special products to make white fabrics look stiff and yellow and old. Yay!
I have aged fabric before using tea, coffee, spray starch, bleach, and sometimes turn the fabric around to use the backside.
Here is a picture showing white eyelet before and after using Gail Wilson's yellowing product:

The sample above, I left to soak in the solution for five minutes. The shirt on the Tam O'Shanter boy, I soaked for less time. You can always soak it again, for longer, so best to start with only a minute or two.
It doesn't have an odor to use, but it does smell somewhat if you iron the dry fabric later. Nothing bad though. it does change the texture of fabric to be stiffer.
When the fabric is all dry, it has no odor.
Monday, June 9, 2014
Bun and Basket Put Away
And now the sun is blasting
The moss has turned quite sere.
Yet we will put bun and basket away
Until Spring, next year.

Wednesday, May 14, 2014
My Tam O' Shanter Boy is done
After many weeks of work, I finished an Izannah-Walker-inspired boy doll. He wears a tam o' shanter and a little plaid suit. He has high socks, and leather boots with buttons... those boots took a lot of finger-power to hand-sew. I planned his clothing to be a Christmas holidays outfit. I began work back in October.
I made his face from a mold I did of my own sculpt, of Esmeralda. I changed the face so much, it was almost like re-sculpting the whole face. As soon as he was dressed, I put him outside to look at the flowers.


After these pictures were taken, I antiqued his arms, headplate and shirt... and his hat. Here is the result:

Thursday, April 24, 2014
Applications with Beeswax
That's a pretty prosaic title, but the whole "wax application" I tried turned out to make not a very dramatic change.
I had a paper bag book I'd finished, and wanted to try putting beeswax over it, as a kind of sealant-texture.
My book is Christmas-themed. I was afraid if I put wax on the cover, which is mostly felt, it might wreck it; so I didn't.

First page I tried putting beeswax on, had this result. I melted wax pellets in an electric melting pot, and then brushed over the page:

It made the finish dull, but I sort of liked it... it kind of unified it.... probably the wax surface can be seen better by clicking on the image....
Second try: I brushed wax (equal parts clear pellets and natural) over a photo.

The third try was on paper with mica glitter glued to it. I brushed wax over it.

And the last try, was on embossed white paper -- I brushed wax heavily on some areas leaving others free of wax.

It adds something; and I didn't like that page much to begin with anyway, so it didn't hurt it.
So, that was my humble experiment putting wax on a couple paper surfaces. Although at first it didn't seem like much, after awhile I liked the effect -- on a few pages of the book, not a whole book. And, it makes the pages waterproof. If not fire-safe.
Monday, April 7, 2014
Wych Mythe?
I have been working along on an art doll, which is to have a theme of moths. I have had this idea in my mind for a long time, of the "Moth fancier." The person who likes moths, and they come to her, by virtue of her liking for books, and clothing, both of which moths like to eat. I have had a few favorite sweaters succumb to moths before I wised up and got cedar blocks.
Ok, so I started the doll by sculpting a head, and breastplate, which fit over the neck of a long bottle...
And I cut out some geranium leaves. I might have to darken those leaves somehow.
The idea with the geranium is that it provides shade, inside the bottle. I have noticed that moths really like geraniums in summer, and often fly out of them when I water. That is, even if they haven't been able to eat the leaves, they like the shade in them later, when they are moths.
Ok that's a lot of backstory, I guess, on my observations about moths; but there's more. Virginia Woolf wanted to write a novel called "The Moths" and refers to it often in her later diaries, but she later changed it to "The Pargiters" (The stone-masons). She never finished the novel.
Also, moths were studied in the 1800s by entymologists ("Moth-fanciers"), because in their change from one form to an entirely different one, moths and butterflies were thought to contain possibly a secret key, to life.....
Although I have interesting whatnot to
refer to about moths, and like them, the doll is going to be about my personal
stuff..... transposed (metamorphozed?) into a piece of art. I hope.
I continued by festooning her with moths, but now I can't figure out whether the moths should be paper, or cloth.


I made the moths using fake fur with trim wrapped around it, and fabric. Their antennae are made of silk fringe from a very old piano shawl. The fabric moths are only about an inch wide. The paper moths (directly above) are from vintage collage sheets. They are more realistic, but also more cartoony, in their way. They don't have the softness and texture of fabric.
So much to consider, with an art doll. Having decided what the idea behind the doll is, I have to find a somehow pleasing way to represent it.... I think if I can decide which moth to use, fabric or paper, that will help me "moth along" on this doll....
Wednesday, April 2, 2014
Saturday, March 22, 2014
Starting an Art Doll
I was inspired to cut some leaves of felt.... they are supposed to look like geranium leaves.

How it happened was, I got the idea for a bottle doll having a geranium inside of it -- so I went outside to make a sketch of the leaves of my favorite plant, a Bevan's geranium. I also studied how the leaves grow, out of the rhizome.
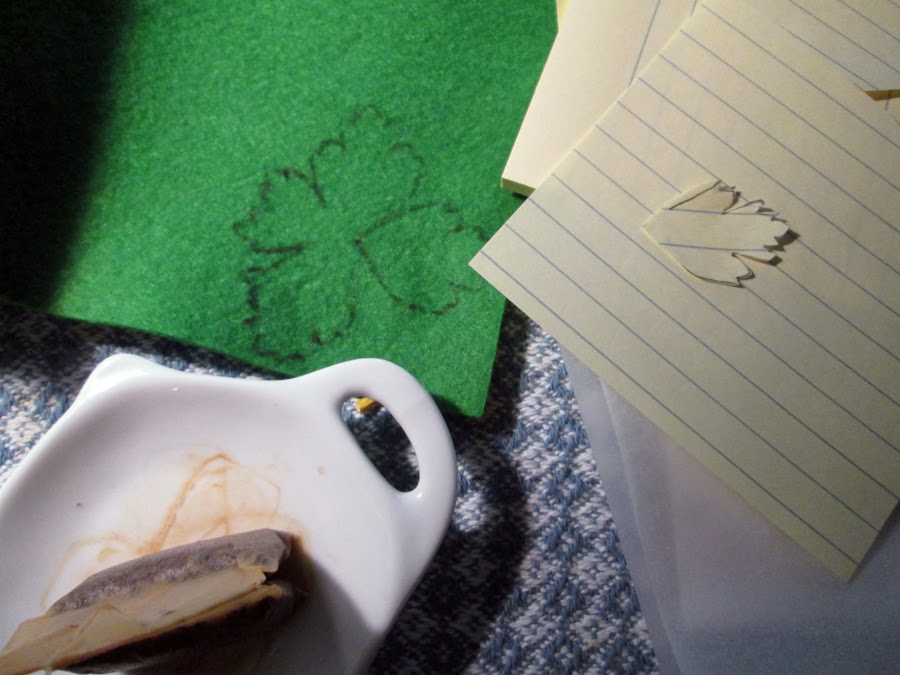
So, after cutting out
the leaves, I feel I am getting somewhere with my art-doll concept.... in the very first stages, now with bits and pieces.... and some hair draped around.

Rejeuvenating a Moss Basket?
This soft moss basket I made several years ago, which holds paperclay painted eggs for Easter, is now brown and dry.

I wanted to see if I could green-up the moss again. I took it outside and sprayed it with water. There was maybe a bit of green still in the bottom of it....

Will the water make it green up again? I hope so.
Sunday, March 9, 2014
Alabama Baby - Finished
Well, after sewing on the hooks in the back of the dress, she or he is done. Here are pictures of my completed Alabama Baby doll, made for the Maida Dolls Group challenge.
I used my own pattern for the doll's body.


The doll is about 18" long, the face painted simply with acrylics. The head is entirely hand-sculpted by me. I started by doing a very different sculpt, but when I saw my error, sawed the sides off, and filled in the eyes.
She is dressed in plain cotton ticking. I liked doing a fancier dress in the ticking, though, with ruffles. It was my first time putting stockinette on a head, too, and it wasn't too too hard, but I have to admit there are a few seams in back.
I noticed about stockinette is that is does take antiquing well. It's much more of a "surface."
Was fun doing this doll! Maybe more are in the future.
Was fun doing this doll! Maybe more are in the future.
Subscribe to:
Posts (Atom)