I took a sculpting class some months ago, and learned so much.... I was sculpting in ceramic clay. This is not the final view, it was taken before the sculpt was fired. It's interesting working in ceramic clay because there is no armature. You just have a big hunk of clay to work on, standing and sculpting it at waist-level on the turntable. We were using all sorts of tools, but most of them familiar, just larger versions of what I use. I found that my doll sculpting experience really helped me. This is the first try I have ever done at doing a realistic type sculpture.
People kept wandering in asking us what we were doing, I guess they didn't realize it was a class...
This is a sculpture-resemblance of my great-great-grandfather; I worked from an old photo of him.
Isn't it remarkable what a class can do for one's skills? I don't know if I could do this well again, but I wowed myself sculpting him.
After all the sculpting was done, we hollowed the busts out on the inside, carefully, and then brushed a glaze over them. Then, the busts were fired in a large kiln.
Thanks for looking!
Tuesday, April 9, 2019
Monday, September 25, 2017
Happy Birthday, Izannah Walker!
Izannah Walker, born in Rhode Island in 1817, began making her dolls in the 1840's. They are believed to be the first commercial dolls made in America. They are made of pressed cloth, using several different dies which gave each doll a unique character. The patent under her name was not filed until 1873, and the dolls after the patent have a different painting style.
They are beautiful dolls, stylized yet lifelike. A group I belong to online is celebrating Izannah's birthday, and several ladies have made beautiful doll creations to celebrate Izannah's birthday. I decided to do a drawing, trying to achieve some likeness of the doll -- it is harder to do than it looks -- that face is very simple but kind of defies being reproduced with drawing or sculpting. I tried to get as many of the features in this drawing as possible, the childish nose, full but small lips, stylized neck, feathery eyebrows, etc.... so this is my interpretation using pencil and watercolor pencil.
Happy Birthday to Izannah Walker!
They are beautiful dolls, stylized yet lifelike. A group I belong to online is celebrating Izannah's birthday, and several ladies have made beautiful doll creations to celebrate Izannah's birthday. I decided to do a drawing, trying to achieve some likeness of the doll -- it is harder to do than it looks -- that face is very simple but kind of defies being reproduced with drawing or sculpting. I tried to get as many of the features in this drawing as possible, the childish nose, full but small lips, stylized neck, feathery eyebrows, etc.... so this is my interpretation using pencil and watercolor pencil.
Happy Birthday to Izannah Walker!
Sunday, July 30, 2017
An Old/New Doll Travels Back East
This doll, I that completed on commission, went to its new owner last month. She is 17 and 3/4 inches; I was aiming for 18 inches, but 17 and 3/4 is good enough for jazz.
The new owner had requested an Izannah-style doll in a Springlike dress.
After making her dress, I discovered a little aging trick. The fabric was orginally a teal blue with lighter blue fleur de lis pattern. I put it in a glass bowl of bleach and water to age it, and the blue background completely left, leaving a greenish-tinged white background, and luckily, also the fleur de lis pattern. I laundered it twice to get the bleach out and soften it up, and then brushed some tea on the seams and edges of the sleeves. Then the dress looked - old!
I made her a bonnet from vintage eyelet and made a fabric flower for it, and she was all set...
I should mention I did the bleaching outside.
She was a pleasure to make.
Thanks for reading, and have a good day.
The new owner had requested an Izannah-style doll in a Springlike dress.
After making her dress, I discovered a little aging trick. The fabric was orginally a teal blue with lighter blue fleur de lis pattern. I put it in a glass bowl of bleach and water to age it, and the blue background completely left, leaving a greenish-tinged white background, and luckily, also the fleur de lis pattern. I laundered it twice to get the bleach out and soften it up, and then brushed some tea on the seams and edges of the sleeves. Then the dress looked - old!
I made her a bonnet from vintage eyelet and made a fabric flower for it, and she was all set...
I should mention I did the bleaching outside.
She was a pleasure to make.
Thanks for reading, and have a good day.
Wednesday, May 3, 2017
Petaluma Gallery Art Doll Show 2016
This is old news, from last year, but I totally dropped posting in the blog all year! I am doing some catchup posts...
I was thrilled to have my dolls accepted into the Petaluma Gallery Art Doll Show last summer. Petaluma is south of Santa Rosa, and has become in recent years a center of artistic activity. The Petaluma Gallery is inside an old train station, which has been rennovated into a very modern and appealing space. It has lovely paint colors and an impressive front atrium which unfortunately I took no photos of.....
Inside are two large rooms, one with tall dividers. On the dividers or baffles alone, more than a hundred dolls were displayed. There were many more hanging or wall dolls on display than seated or standing dolls in that room. The doll category included "figure" because many dolls were not poseable. I thought some of the best sculpting was by a ceramicist (in the foreground).
It was thrilling to see my dolls displayed so near the entrance. The show had an audio tour, and some video kiosks set up. I guess there were maybe 300 dolls and 60 dollmakers represented. Many were big-names and familiar to me, including Toby Froud, so this was actually a big boost to me, to see my work alongside theirs.
They also had a silent auction where you could buy work by artists such as Anke Daanen and many other talented artists from all over the globe.
The theme of the show was "Journeys Through Light and Dark." The dolls ran the spectrum and all kinds of dollmaking using many kinds of media were represented. All the dolls depicted an artist's individual vision.
I didn't offer my dolls for sale, only display. I am very thankful to the curators of the Petaluma Gallery Doll Show for giving me this opportunity. I am really glad I could go with some family members to the show, including my Mother.
I was thrilled to have my dolls accepted into the Petaluma Gallery Art Doll Show last summer. Petaluma is south of Santa Rosa, and has become in recent years a center of artistic activity. The Petaluma Gallery is inside an old train station, which has been rennovated into a very modern and appealing space. It has lovely paint colors and an impressive front atrium which unfortunately I took no photos of.....
Inside are two large rooms, one with tall dividers. On the dividers or baffles alone, more than a hundred dolls were displayed. There were many more hanging or wall dolls on display than seated or standing dolls in that room. The doll category included "figure" because many dolls were not poseable. I thought some of the best sculpting was by a ceramicist (in the foreground).
It was thrilling to see my dolls displayed so near the entrance. The show had an audio tour, and some video kiosks set up. I guess there were maybe 300 dolls and 60 dollmakers represented. Many were big-names and familiar to me, including Toby Froud, so this was actually a big boost to me, to see my work alongside theirs.
They also had a silent auction where you could buy work by artists such as Anke Daanen and many other talented artists from all over the globe.
The theme of the show was "Journeys Through Light and Dark." The dolls ran the spectrum and all kinds of dollmaking using many kinds of media were represented. All the dolls depicted an artist's individual vision.
I didn't offer my dolls for sale, only display. I am very thankful to the curators of the Petaluma Gallery Doll Show for giving me this opportunity. I am really glad I could go with some family members to the show, including my Mother.
Sunday, April 16, 2017
Making My Own Vintage Glitter Compact
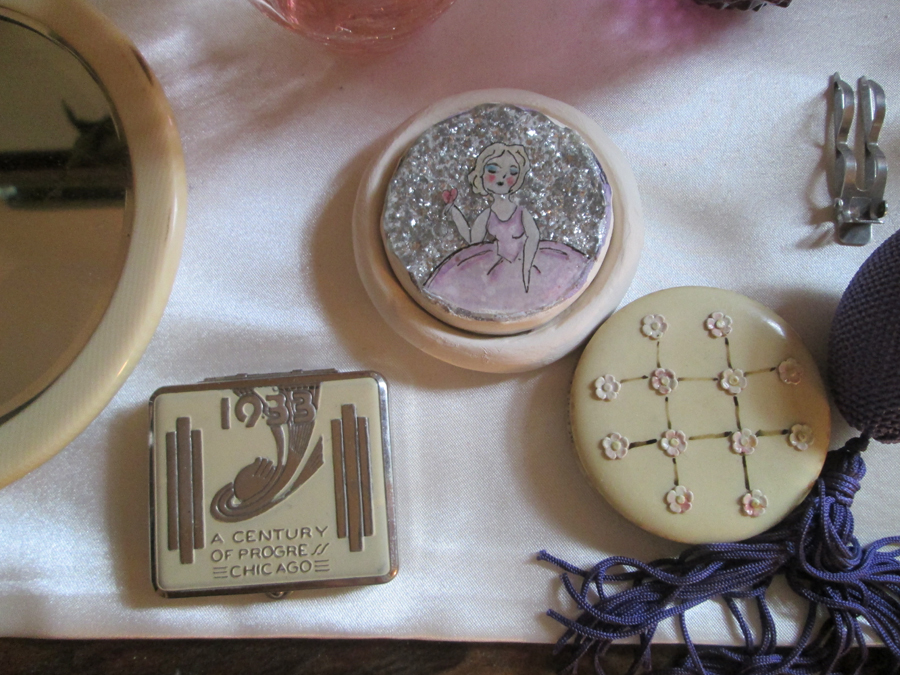
I have been merrily collecting vintage powder compacts for at least a year now, and had been coveting the (quite expensive) vintage glitter powder compacts from the 1920s and 30s. They go on Ebay for at least 200, maybe 300 dollars. They are small, about 2 and a half inches across.
They usually have a reverse-painted drawing of a lady, holding a fan or a puff. The lady is painted under a glass dome, with glitter placed underneath.
I thought, how hard would that be to make? Maybe not too hard? I can have the lady be of paper, and the dome be made from Gel Du Soleil. Gel Du Soleil is this fun plasticy gel that cures in UV light and makes a dome while it dries. That would kind of simulate the glass-dome look. So I thought I would try making a glitter compact.
The Paperclay is the stand-in for the metal, Bakelite or Celluloid plastic which is the lid and base of the compact.
So here's a picture of the result, and below it, the steps:
First roll out a slab of paperclay, cut it into a circle, and find a jar lid.
Press the top of the lid into the circle of paperclay to make the sides go up, and then carefully round and smooth the sides. Don't press all the way to the bottom. Let dry.
Then take out the lid. So there you have the base, that the lid will rest inside.
Now take up the plastic lid. You will be putting all the glitter and paper and gel on top of the lid. This is not the lid I used, it is just for illustration purposes. But, you could use this type of lid.
On top of the lid, spread glue, and then pour silver glitter all over so it covers completely. Let dry.
Draw a picture of a lady on a piece of paper, using marker pen, and colored pencils. I used printer paper because it was on hand but when I poured Gel du Soleil over it, it darkened and got a little grey. That is ok, but thicker paper might stay whiter.
So, then place the cut-out of your drawing on top of the glitter (you don't have to glue the paper down), and carefully pour Gel Du Soleil Gel over, after you place it carefully in a level space, in the bright sun. The gel will be hard within minutes. Pour in the center. The gel will slowly move just to the edge, and stay put, covering the whole top.

The sides where the gel met the rim, are a little messy. Maybe using a lid that has a tiny rim on top, might have made it a lot neater. I then sanded and painted the paperclay a cream color to make it look a little like celluloid.
Ok it blends in sort of, with my other Thirties compacts, and I did not have to spend 300 dollars! It's not going to fool anyone.... but it satisfied my desire for a French glitter compact, with some of the look at least.
Sunday, November 29, 2015
"On A Little Chair Dolls" - Commissions
Welcome to my blog about my dollmaking enterprise as "On A Little Chair Dolls."
I love making dolls, and I accept commissions, for making a doll in the style of my "Boy" and "Phoebe" dolls. They are Izannah Walker style folk dolls.
I also make Googly dolls, on request.
Please click on "Gallery of Dolls" tab above, to see "Boy" and "Phoebe," and also a few Googly dolls.
I put a lot of care into every doll, and each one takes several months to complete.
For inquiries about having a doll made for you, please email me at Tiredself1@gmail.com.
I love making dolls, and I accept commissions, for making a doll in the style of my "Boy" and "Phoebe" dolls. They are Izannah Walker style folk dolls.
I also make Googly dolls, on request.
Please click on "Gallery of Dolls" tab above, to see "Boy" and "Phoebe," and also a few Googly dolls.
I put a lot of care into every doll, and each one takes several months to complete.
For inquiries about having a doll made for you, please email me at Tiredself1@gmail.com.
Saturday, May 9, 2015
Cleaning Out My Vintage Compacts
I have been working on dolls, but sometimes it helps to do two projects at once, or even three,
so I can alternate projects, rather than stop and decide what to do next.
So I have been cleaning compacts; and yesterday cleaned out a very powdery one. I will share how I clean them; this is just how I clean loose powder compacts. To see how I clean pressed powder compacts, see this other post.
This is a Max Factor loose powder compact from the Fifties. I take no chances. Before I even cut open the package from the seller, I put on my respirator, and store the compact in a plastic bag.
Then when I go outside to clean it, I put the full hazmat outfit on.

Gloves, respirator, a shower cap - it was sliding off my hair - and safety goggles.
I work outside, on a little table and keep all these supplies close to hand: plastic bags, 7th Generation or some other mild spray cleaner, tissues, seasalt, a cheap stiff bristle paintbrush and a soft paintbrush with a chisel end.
First I put the compact inside a plastic bag, dump out as much powder as I can into the bag, take the compact out, and tie the bag off and put it aside.
Then, I put the compact down on a tissue placed on the table, and pour sea salt into the remaining powder in the powder well.

I use a cheap bristle brush to loosen the powder, mixing the salt with the powder. I also loosen the powder "bumper" on the side. You can see it
coming off the sides, in the picture. I pull the bumper out and keep on mixing.
The advantage of using salt, is that no powder floats around. The salt kind of sticks to the powder, blends with it, so it doesn't lift off into the air.
I think the powder is scarey. They used all kinds of technologies to make the powder very light, and also very adherent - plus it was used by someone.
After mixing for a minute or two, I dump the powder-and-salt into a plastic bag and tie the bag off. Another plus is that the salt has acted as a mild abrasive cleaner. There was no powder drifting around, no pressure applied by rubbing, and no use of liquids. I still have to use cleaner to fine-clean, but using salt is a good first step.
I also like using salt-and-mixing because it allows me to safely see what is on the inside of the compact. Sometimes I discover stuff about the compact. There might be a sharp edge, or a chip in the mirror; I don't want to be using my hand to clean and find that kind of thing.
The powder "bumper" was kind of a woolen strip in there to keep the powder in, and I can't really clean that thing, so out it comes with the powder. It leaves behind a bit of glue where it was attached.
Next I use the chisel plastic end of an ordinary paintbrush to scrape off the bumper glue residue from the inside of the powder well. I also take out the wax paper liner that is sometimes inside compacts. I would like to preserve that little piece of wax paper, but my goal is no powder smell whatsoever.
Then I spray 7th Generation cleaner or some other mild cleaner on tissues, to clean off remaining traces of powder. I never spray directly onto the compact or mirror.
It is important to have a paper towel or soft surface to work on top of, so you don't scratch the bottom of the compact while working on it. You also have to be careful wiping the mirror. Best to hold it with a thumb while you wipe. This one doesn't have a crack, it just looks that way in the picture.
Then I use a small soft paintbrush to get all the teeny bits of powder lurking around the hinge, latch and around the mirror.
I wipe it some more with cleaner, use the brush some more, wipe again...
And finally I wipe the compact carefully with a soft microdusting cloth.
Now the compact is clean and I can enjoy picking it up and opening it. I think I could even use this compact, because the 7th Generation cleaner also disinfects.
There is the question of what to do about used, dusty puffs and screens. I have tossed many that were caked with powder and dirt and whatnot, but some I could not bear to toss and stored in plastic bags. Lately I am cleaning them with a toothbrush and soap. I think i will still store them separately though, I can not bear the vomitous smell of old powder
So I hope this explains clearly enough, one way to clean your vintage compacts.
so I can alternate projects, rather than stop and decide what to do next.
So I have been cleaning compacts; and yesterday cleaned out a very powdery one. I will share how I clean them; this is just how I clean loose powder compacts. To see how I clean pressed powder compacts, see this other post.
This is a Max Factor loose powder compact from the Fifties. I take no chances. Before I even cut open the package from the seller, I put on my respirator, and store the compact in a plastic bag.
Then when I go outside to clean it, I put the full hazmat outfit on.

Gloves, respirator, a shower cap - it was sliding off my hair - and safety goggles.
I work outside, on a little table and keep all these supplies close to hand: plastic bags, 7th Generation or some other mild spray cleaner, tissues, seasalt, a cheap stiff bristle paintbrush and a soft paintbrush with a chisel end.
First I put the compact inside a plastic bag, dump out as much powder as I can into the bag, take the compact out, and tie the bag off and put it aside.
Then, I put the compact down on a tissue placed on the table, and pour sea salt into the remaining powder in the powder well.

I use a cheap bristle brush to loosen the powder, mixing the salt with the powder. I also loosen the powder "bumper" on the side. You can see it
coming off the sides, in the picture. I pull the bumper out and keep on mixing.
The advantage of using salt, is that no powder floats around. The salt kind of sticks to the powder, blends with it, so it doesn't lift off into the air.
I think the powder is scarey. They used all kinds of technologies to make the powder very light, and also very adherent - plus it was used by someone.
After mixing for a minute or two, I dump the powder-and-salt into a plastic bag and tie the bag off. Another plus is that the salt has acted as a mild abrasive cleaner. There was no powder drifting around, no pressure applied by rubbing, and no use of liquids. I still have to use cleaner to fine-clean, but using salt is a good first step.
I also like using salt-and-mixing because it allows me to safely see what is on the inside of the compact. Sometimes I discover stuff about the compact. There might be a sharp edge, or a chip in the mirror; I don't want to be using my hand to clean and find that kind of thing.
The powder "bumper" was kind of a woolen strip in there to keep the powder in, and I can't really clean that thing, so out it comes with the powder. It leaves behind a bit of glue where it was attached.
Next I use the chisel plastic end of an ordinary paintbrush to scrape off the bumper glue residue from the inside of the powder well. I also take out the wax paper liner that is sometimes inside compacts. I would like to preserve that little piece of wax paper, but my goal is no powder smell whatsoever.
It is important to have a paper towel or soft surface to work on top of, so you don't scratch the bottom of the compact while working on it. You also have to be careful wiping the mirror. Best to hold it with a thumb while you wipe. This one doesn't have a crack, it just looks that way in the picture.
Then I use a small soft paintbrush to get all the teeny bits of powder lurking around the hinge, latch and around the mirror.
I wipe it some more with cleaner, use the brush some more, wipe again...
And finally I wipe the compact carefully with a soft microdusting cloth.
Now the compact is clean and I can enjoy picking it up and opening it. I think I could even use this compact, because the 7th Generation cleaner also disinfects.
There is the question of what to do about used, dusty puffs and screens. I have tossed many that were caked with powder and dirt and whatnot, but some I could not bear to toss and stored in plastic bags. Lately I am cleaning them with a toothbrush and soap. I think i will still store them separately though, I can not bear the vomitous smell of old powder
So I hope this explains clearly enough, one way to clean your vintage compacts.
Friday, February 6, 2015
Trying Out Fabrics
I painted the boudoir doll's face, that I sculpted in paperclay. And added hair. Now I am picking out her colors for her outfit!
I think she is looking good in linen, dark plum (that's what the dark feather is), rose, pale pink, and blue greens!
Sunday, December 28, 2014
A Boudoir Doll in Progress
After working on cleaning the Ebay Keen-Eye boudoir doll, I felt like making an art-boudoir doll of my own. So here is a work-in-progress shot; I am trying fabrics on her, to see how she does with either pink and old lace, or blue satin with red polyester lace that I have a lot of.
It's great fun to try the fabrics with the doll at this stage and see how they match with the doll's expression.
One thing I do that really helps with sculpting, is I tilt the doll head under a bright light, and see how the shadows form as I tilt the head downward. If the shadows fall evenly, I know I have an even sculpt. I will illustrate it in a future post, but basically I look at the shadows and see if they are even, at each stage while I tilt the doll head.
So with this doll I like her now, I think; just a little bit of sanding to do. Have to decide on which fabric.
It's great fun to try the fabrics with the doll at this stage and see how they match with the doll's expression.
One thing I do that really helps with sculpting, is I tilt the doll head under a bright light, and see how the shadows form as I tilt the head downward. If the shadows fall evenly, I know I have an even sculpt. I will illustrate it in a future post, but basically I look at the shadows and see if they are even, at each stage while I tilt the doll head.
So with this doll I like her now, I think; just a little bit of sanding to do. Have to decide on which fabric.
Monday, November 10, 2014
A Workshop with Judy Barclift
I belong to a doll group which last month, hosted a workshop given by Judy Barclift, who is a fabulous California sculptor. She sculpts in a way that is very realistic, yet has her trademark style as well. She gave the workshop using polymer clay, which I hadn't tried sculpting a face in yet. The workshop was to make a "Jack on a Stick," a pumpkin or decorative squash head for Hallowe'en. The class was fun and we learned a lot. While my own sculpting does not approach hers, I still was pleased to get a pumpkin character, whom I thought looked French. I added some of my own trims, and found that I had sculpted.... a French onion seller!

He is a dapper older gentleman who
sells onions in the french countryside.
And here he is, relaxing back at home.
Vintage Compacts - Reflections of History
I recently got involved with collecting vintage ladies' compacts. It is kind of a fascinating hobby, because they are like bits of history in your hand. There is the influence of style, and advances in American manufacturing are reflected in each decade's worth of compacts.
I never really thought about compacts, or even makeup much, until this summer. Maybe the boudoir doll got me interested in them somehow... it was her influence.
Here is a Thirties vanity I am starting to arrange, with two bullet boudoir lamps and some vintage enamel compacts... plus, movie star pictures and the head of the boudoir doll, looming on the right in the background.
Here are some Seventies and Sixties compacts I purchased and cleaned last week:
They harbored fifty year-old powder...which I have no intention of wearing, smelling or breathing. I always wear a respirator when I work on cleaning out compacts. I also wear cheap latex gloves, and plastic goggles, and throw my clothing in the washing machine afterward. AND take a shower.
The way I clean out pressed powder compact such as these is: I use a bent-out end of a heavy duty paper clip to push the powder cake pan out of the compact - there is a little hole on the back of the compact, where you can insert a paper clip wire or some other thick wire to push it out. Then I put the powder pan inside a thicker-type clear plastic bag, such as a freezer bag. Keeping the bag as closed as I can, to control the powder, I reach inside the bag with a stick or paintbrush end, and start pressing down on the powder until it breaks up. The powder breaks up under pressure, but it is under control because I am breaking it up inside the bag. I turn the pan over to dump powder into the bag, take the pan out and put it into another bag I have ready, and ziplock shut the first bag.
Then with most of the powder gone, I clean the pan more, wiping it off several times with 7th generation cleaner or some kind of mild cleaner. Then the pan can be put back in the compact, which has been wiped with the spray cleaner. I never have problems with a mild cleaner discoloring the plastic. Sometimes if there is a lingering perfumey odor from the powder, I put the compact in hot sun in the backyard to bake off the odor. That works sometimes to take the smell away.
Tuesday, September 23, 2014
Boudoir Doll Progress
Yesterday I had the gumption, (I wonder where does that word come from?) to get out the box in the garage that contains the Boudoir doll that I bought on Ebay last year. After buying her, I had cleaned her dress and petticoats, and then stored her away for later.
I think she is a "Keen-Eye," from maybe the late Thirties, based on my readings of these dolls.
I sat her outside, and started in on cleaning her with Seventh Generation Natural All Purpose cleaner. It is a nontoxic eco-friendly cleaner; and more to protect myself from the doll itself than the cleaner, I wore a respirator, eye protection, gloves and a shower cap! Can't be too careful around dust!
The reason for this is because she was stuffed with kapok, which has in eighty years, turned to very fine dusty sawdust. Kapok dust exudes when you squeeze the doll, and is all over your hands when you handle it. Hack, cough.
Even though I think dolls should be preserved in as original condition as possible, it would be impossible to have this doll, as is, in one's environment.
So I donned my garb and tried cleaning the back of one of her boots. When I saw the cleaner worked well and did not strip the paint whatsoever, then I used it on the arm, then boldy used it on the face. I sprayed it onto the tissue first and then rubbed giving it some elbow grease.
Her face before cleaning
After cleaning.
So, it looks like Seventh Generation cleaner works, for cleaning this type of doll.....
I really must paint her lips, they are distressing....
Part Two.
After that, I cut off her arms and legs, and simply pulled her head off her body easily; the glue attaching it was dried out. I decided I didn't want any more dust kapok, I can make her a new body. I traced her body onto pattern paper, and made note of how her legs and arms are to be attached:
1. The leg has a shallow top rim. 2. put the fabric leg upside down and the leg up inside it (see-through view)
3. put wire over the top of the fabric, securing it onto the leg rim. 4. Pull the fabric leg up the right way, to hide the rim and the wire. 5. Stuff.
You could also put a plug of wool in there before you pull the cloth leg up, as in 3. This keeps stuffing from going down into the leg, because it is hollow, and stabilizes it.
Well, that was some good progress, and now the next step is to find some eye-lash bristles, and touch up her paint.
Sunday, August 17, 2014
Varnish Thoughts
I really have some trouble figuring out what to use for varnish, if any. It's the final step, and it's the moment when you say, do I want to risk all the work I did on this doll face. Do I dare maybe wrecking my work.
Matte is flat, and I do enjoy seeing a little gleam on the cheek of a doll. I suppose I should just let them be matte and flat. They mostly pre-date varnish.
I recently worked some more on this Queen Anne-style doll of mine and then varnished it. I think I was telling myself, "this doll is finished. Now varnish it." But now she's pretty shiny.
I know I could put matte over the satin varnish in spots, I have done that before to tone down shine. I just wish I could find a finish with an even, somewhat dull shine..... like dolls of yore. I am thinking if she is paperclay trying to look like wood, wax is the answer. I must try wax over paperclay.
Thanks for looking and I hope you have a great day.
Wednesday, July 16, 2014
My Lisa Lichtenfels "Elder" Doll
I recently took Lisa Lichtenfels' four-day nylon-sculpting class -- she is known for her incredibly realistic nylon sculpting.
First, she taught us how to nylon-sculpt a doll head. Lisa had set the eyes to begin with, and I went from there, sculpting the facial features with curved needles. Then she taught us how to constuct the body armature, and build up the body to the point of being covered with nylon, all the while going for a realistic look. Then we each dressed our dolls in fabrics we chose. I used my own clothing pattern and her slippers pattern.
Lisa is a great teacher, well organized and also relaxed. She took time to go around and work with each student, several times during the course. It was great fun to meet her. She has entertaining tales of working as an artist in New York.
My doll is sewing on pieces for a quilt. I have fond memories of my grandmother working on her quilts. I would sit near her on the windowseat and we would talk. The cat and the dog were also there, at opposite ends.
Subscribe to:
Posts (Atom)