Page Listing

Monday, September 25, 2017

Happy Birthday, Izannah Walker!

Izannah Walker, born in Rhode Island in 1817, began making her dolls in the 1840's.  They are believed to be the first commercial dolls made in America.  They are made of pressed cloth, using several different dies which gave each doll a unique character.  The patent under her name was not filed until 1873, and the dolls after the patent have a different painting style.

They are beautiful dolls, stylized yet lifelike.  A group I belong to online is celebrating Izannah's birthday, and several ladies have made beautiful doll creations to celebrate Izannah's birthday.  I decided to do a drawing, trying to achieve some likeness of the doll -- it is harder to do than it looks -- that face is very simple but kind of defies being reproduced with drawing or sculpting.  I tried to get as many of the features in this drawing as possible, the childish nose, full but small lips, stylized neck, feathery eyebrows, etc.... so this is my interpretation using pencil and watercolor pencil.


             Happy Birthday to Izannah Walker!


Sunday, July 30, 2017

An Old/New Doll Travels Back East

This doll, I that completed on commission, went to its new owner last month.  She is 17 and 3/4 inches; I was aiming for 18 inches, but 17 and 3/4 is good enough for jazz.

The new owner had requested an Izannah-style doll in a Springlike dress.

After making her dress, I discovered a little aging trick.  The fabric was orginally a teal blue with lighter blue fleur de lis pattern.  I put it in a glass bowl of bleach and water to age it, and the blue background completely left, leaving a greenish-tinged white background, and luckily, also the fleur de lis pattern.  I laundered it twice to get the bleach out and soften it up, and then brushed some tea on the seams and edges of the sleeves.  Then the dress looked - old! 


I made her a bonnet from vintage eyelet and made a fabric flower for it, and she was all set...

I should mention I did the bleaching outside.  

She was a pleasure to make.

Thanks for reading, and have a good day. 


Wednesday, May 3, 2017

Petaluma Gallery Art Doll Show 2016

This is old news, from last year, but I totally dropped posting in the blog all year!  I am doing some catchup posts...

I was thrilled to have my dolls accepted into the Petaluma Gallery Art Doll Show last summer.   Petaluma is south of Santa Rosa, and has become in recent years a center of artistic activity.  The Petaluma Gallery is inside an old train station, which has been rennovated into a very modern and appealing space.  It has lovely paint colors and an impressive front atrium which unfortunately I took no photos of.....

Inside are two large rooms, one with tall dividers.  On the dividers or baffles alone, more than a hundred dolls were displayed.  There were many more hanging or wall dolls on display than seated or standing dolls in that room.  The doll category included "figure" because many dolls were not poseable.  I thought some of the best sculpting was by a ceramicist (in the foreground).

It was thrilling to see my dolls displayed so near the entrance.  The show had an audio tour, and some video kiosks set up.   I guess there were maybe 300 dolls and 60 dollmakers represented.  Many were big-names and familiar to me, including Toby Froud, so this was actually a big boost to me, to see my work alongside theirs. 

They also had a silent auction where you could buy work by artists such as Anke Daanen and many other talented artists from all over the globe.  

The theme of the show was "Journeys Through Light and Dark." The dolls ran the spectrum and all kinds of dollmaking using many kinds of media were represented.  All the dolls depicted an artist's individual vision. 


I didn't offer my dolls for sale, only display.  I am very thankful to the curators of the Petaluma Gallery Doll Show for giving me this opportunity.  I am really glad I could go with some family members to the show, including my Mother. 

Sunday, April 16, 2017

Making My Own Vintage Glitter Compact


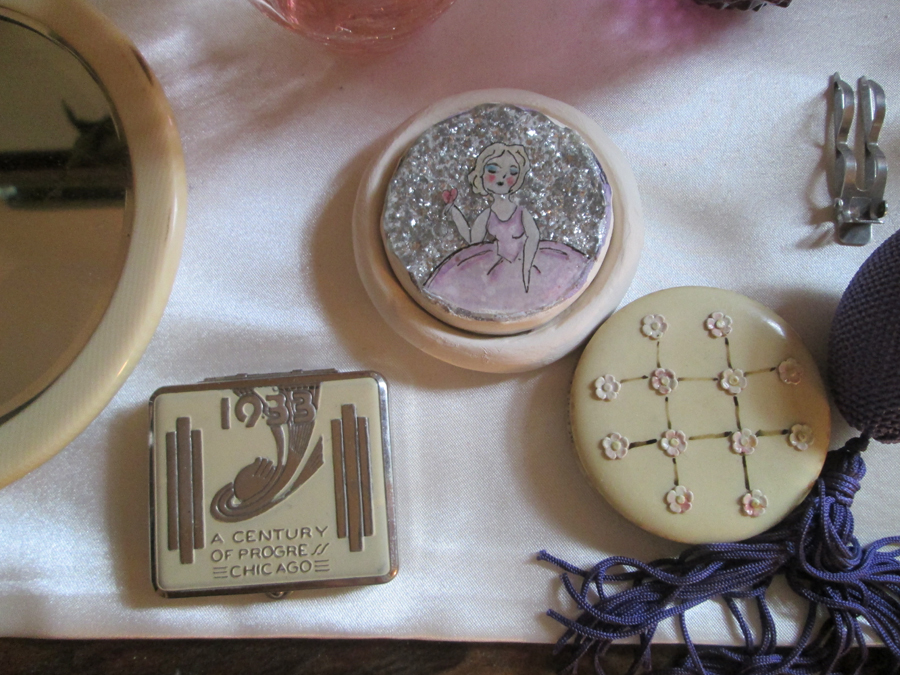
I have been merrily collecting vintage powder compacts for at least a year now, and had been coveting the (quite expensive) vintage glitter powder compacts from the 1920s and 30s.  They go on Ebay for at least 200, maybe 300 dollars.  They are small, about 2 and a half inches across. 


They usually have a reverse-painted drawing of a lady, holding a fan or a puff.  The lady is painted under a glass dome, with glitter placed underneath.

I thought, how hard would that be to make?  Maybe not too hard?  I can have the lady be of paper, and the dome be made from Gel Du Soleil.  Gel Du Soleil is this fun plasticy gel that cures in UV light and makes a dome while it dries.  That would kind of simulate the glass-dome look.  So I thought I would try making a glitter compact.

The Paperclay is the stand-in for the metal, Bakelite or Celluloid plastic which is the lid and base of the compact.

So here's a picture of the result, and below it, the steps:


 First roll out a slab of paperclay, cut it into a circle, and find a jar lid.  


Press the top of the lid into the circle of paperclay to make the sides go up, and then carefully round and smooth the sides.  Don't press all the way to the bottom.  Let dry.
Then take out the lid. So there you have the base, that the lid will rest inside. 


Now take up the plastic lid.  You will be putting all the glitter and paper and gel on top of the lid.   This is not the lid I used, it is just for illustration purposes.  But, you could use this type of lid. 


 On top of the lid, spread glue, and then pour silver glitter all over so it covers completely.  Let dry.
Draw a picture of a lady on a piece of paper, using marker pen, and colored pencils.  I used printer paper because it was on hand but when I poured Gel du Soleil over it, it darkened and got a little grey.  That is ok, but thicker paper might stay whiter.  

So, then place the cut-out of your drawing on top of the glitter (you don't have to glue the paper down), and carefully pour Gel Du Soleil Gel over, after you place it carefully in a level space, in the bright sun.  The gel will be hard within minutes.  Pour in the center.  The gel will slowly move just to the edge, and stay put, covering the whole top.


The sides where the gel met the rim, are a little messy.  Maybe using a lid that has a tiny rim on top, might have made it a lot neater.  I then sanded and painted the paperclay a cream color to make it look a little like celluloid. 


Ok it blends in sort of, with my other Thirties compacts, and I did not have to spend 300 dollars!   It's not going to fool anyone.... but it satisfied my desire for a French glitter compact, with some of the look at least.


Related Posts Plugin for WordPress, Blogger...