Page Listing

Showing posts with label dollmaking. Show all posts

Sunday, July 30, 2017

An Old/New Doll Travels Back East

This doll, I that completed on commission, went to its new owner last month.  She is 17 and 3/4 inches; I was aiming for 18 inches, but 17 and 3/4 is good enough for jazz.

The new owner had requested an Izannah-style doll in a Springlike dress.

After making her dress, I discovered a little aging trick.  The fabric was orginally a teal blue with lighter blue fleur de lis pattern.  I put it in a glass bowl of bleach and water to age it, and the blue background completely left, leaving a greenish-tinged white background, and luckily, also the fleur de lis pattern.  I laundered it twice to get the bleach out and soften it up, and then brushed some tea on the seams and edges of the sleeves.  Then the dress looked - old! 


I made her a bonnet from vintage eyelet and made a fabric flower for it, and she was all set...

I should mention I did the bleaching outside.  

She was a pleasure to make.

Thanks for reading, and have a good day. 


Wednesday, May 3, 2017

Petaluma Gallery Art Doll Show 2016

This is old news, from last year, but I totally dropped posting in the blog all year!  I am doing some catchup posts...

I was thrilled to have my dolls accepted into the Petaluma Gallery Art Doll Show last summer.   Petaluma is south of Santa Rosa, and has become in recent years a center of artistic activity.  The Petaluma Gallery is inside an old train station, which has been rennovated into a very modern and appealing space.  It has lovely paint colors and an impressive front atrium which unfortunately I took no photos of.....

Inside are two large rooms, one with tall dividers.  On the dividers or baffles alone, more than a hundred dolls were displayed.  There were many more hanging or wall dolls on display than seated or standing dolls in that room.  The doll category included "figure" because many dolls were not poseable.  I thought some of the best sculpting was by a ceramicist (in the foreground).

It was thrilling to see my dolls displayed so near the entrance.  The show had an audio tour, and some video kiosks set up.   I guess there were maybe 300 dolls and 60 dollmakers represented.  Many were big-names and familiar to me, including Toby Froud, so this was actually a big boost to me, to see my work alongside theirs. 

They also had a silent auction where you could buy work by artists such as Anke Daanen and many other talented artists from all over the globe.  

The theme of the show was "Journeys Through Light and Dark." The dolls ran the spectrum and all kinds of dollmaking using many kinds of media were represented.  All the dolls depicted an artist's individual vision. 


I didn't offer my dolls for sale, only display.  I am very thankful to the curators of the Petaluma Gallery Doll Show for giving me this opportunity.  I am really glad I could go with some family members to the show, including my Mother. 

Monday, November 10, 2014

A Workshop with Judy Barclift

I belong to a doll group which last month, hosted a workshop given by Judy Barclift, who is a fabulous California sculptor.  She sculpts in a way that is very realistic, yet has her trademark style as well.  She gave the workshop using polymer clay, which I hadn't tried sculpting a face in yet.  The workshop was to make a "Jack on a Stick," a pumpkin or decorative squash head for Hallowe'en.  The class was fun and we learned a lot.  While my own sculpting does not approach hers, I still was pleased to get a pumpkin character, whom I thought looked French.  I added some of my own trims, and found that I had sculpted.... a French onion seller! 


He is a dapper older gentleman who
sells onions in the french countryside.


Ah yes, we had many good times  togethair.......


And here he is, relaxing back at home. 

Sunday, August 17, 2014

Varnish Thoughts

I really have some trouble figuring out what to use for varnish, if any.  It's the final step, and it's the moment when you say, do I want to risk all the work I did on this doll face.  Do I dare maybe wrecking my work.  

Matte is flat, and I do enjoy seeing a little gleam on the cheek of a doll.  I suppose I should just let them be matte and flat.  They mostly pre-date varnish. 

I recently worked some more on this Queen Anne-style doll of mine and then varnished it.  I think I was telling myself, "this doll is finished.  Now varnish it."  But now she's pretty shiny. 


I know I could put matte over the satin varnish in spots, I have done that before to tone down shine.  I just wish I could find a finish with an even, somewhat dull shine.....  like dolls of yore.  I am thinking if she is paperclay trying to look like wood, wax is the answer.  I must try wax over paperclay.


Thanks for looking and I hope you have a great day. 


Wednesday, July 16, 2014

My Lisa Lichtenfels "Elder" Doll

I recently took Lisa Lichtenfels' four-day nylon-sculpting class -- she is known for her incredibly realistic nylon sculpting.  

First, she taught us how to nylon-sculpt a doll head.  Lisa had set the eyes to begin with, and I went from there,  sculpting the facial features with curved needles.  Then she taught us how to constuct the body armature, and build up the body to the point of being covered with nylon, all the while going for a realistic look.  Then we each dressed our dolls in fabrics we chose.  I used my own clothing pattern and her slippers pattern. 

Lisa is a great teacher, well organized and also relaxed.  She took time to go around and work with each student, several times during the course.  It was great fun to meet her.  She has entertaining tales of working as an artist in New York. 


 My doll is sewing on pieces for a quilt.  I have fond memories of my grandmother working on her quilts.  I would sit near her on the windowseat and we would talk.  The cat and the dog were also there, at opposite ends. 

Getting Around to the Moth Doll

I finally finished my art-doll, "Virginia Moth."  Or, I could call her "Madama Moth."  I started her as a bottle doll (see earlier posts), but then totally changed the idea to this!   I made her for my local doll group challenge of "Flight." 


I gave her a loop so she can hang out on the wall....  before she descends onto her next natural-fiber piece of clothing in the closet... :( 


Although I started out thinking she would be made of all-natural-fiber material, I had this piece of polyester cafe-colored fabric I liked.  I first started chopping it up for moth wings for the moths that are adorning her.  
I decided to give her sort of kimono sleeves, and round "moth-eye" patches on each sleeve.  She has only short wire arms and small wire legs, wrapped with cotton, under her costume, but her body is full and soft (moths have thicker bodies than butterflies) and is made of cotton on a wire armature. 


It's a stretchy fabric, but it almost evokes lace, or trapunto.  It drapes well, so I decided I didn't want to hack it into little bits, I wanted her to wear it. 


Continuing onward, I gave her a thick, tattered, velvet shawl, which I think is a polyester velvet.  It had good fraying at the edges, and so she can sit wrapped in it; and it the texture goes with her dress.


So, I went from thinking in terms of little frayed pieces, to larger draped ones, and I like the feeling of the doll the better for it.  I drew kind of a boudoir face, thinking she should have large "moth-like" eyelashes and eyes. 
She has a big seam down the front of her face, but I left it there and didn't cover it with a "cloth-over."  Because she's a little weird.  She's a moth....the seam adds to the weirdness. 
 
 I hope you like my "moth doll."  She was my little moth adventure. 


Wednesday, May 14, 2014

My Tam O' Shanter Boy is done

After many weeks of work, I finished an Izannah-Walker-inspired boy doll.  He wears a tam o' shanter and a little plaid suit.  He has high socks, and leather boots with buttons... those boots took a lot of finger-power to hand-sew.  I planned his clothing to be a Christmas holidays outfit.  I began work back in October.

I made his face from a mold I did of my own sculpt, of Esmeralda.  I changed the face so much, it was almost like re-sculpting the whole face.   As soon as he was dressed, I put him outside to look at the flowers.  


After these pictures were taken, I antiqued his arms, headplate and shirt... and his hat.  Here is the result:  


Monday, April 7, 2014

Wych Mythe?

I have been working along on an art doll, which is to have a theme of moths.  I have had this idea in my mind for a long time, of the "Moth fancier."  The person who likes moths, and they come to her, by virtue of her liking for books, and clothing, both of which moths like to eat.  I have had a few favorite sweaters succumb to moths before I wised up and got cedar blocks. 

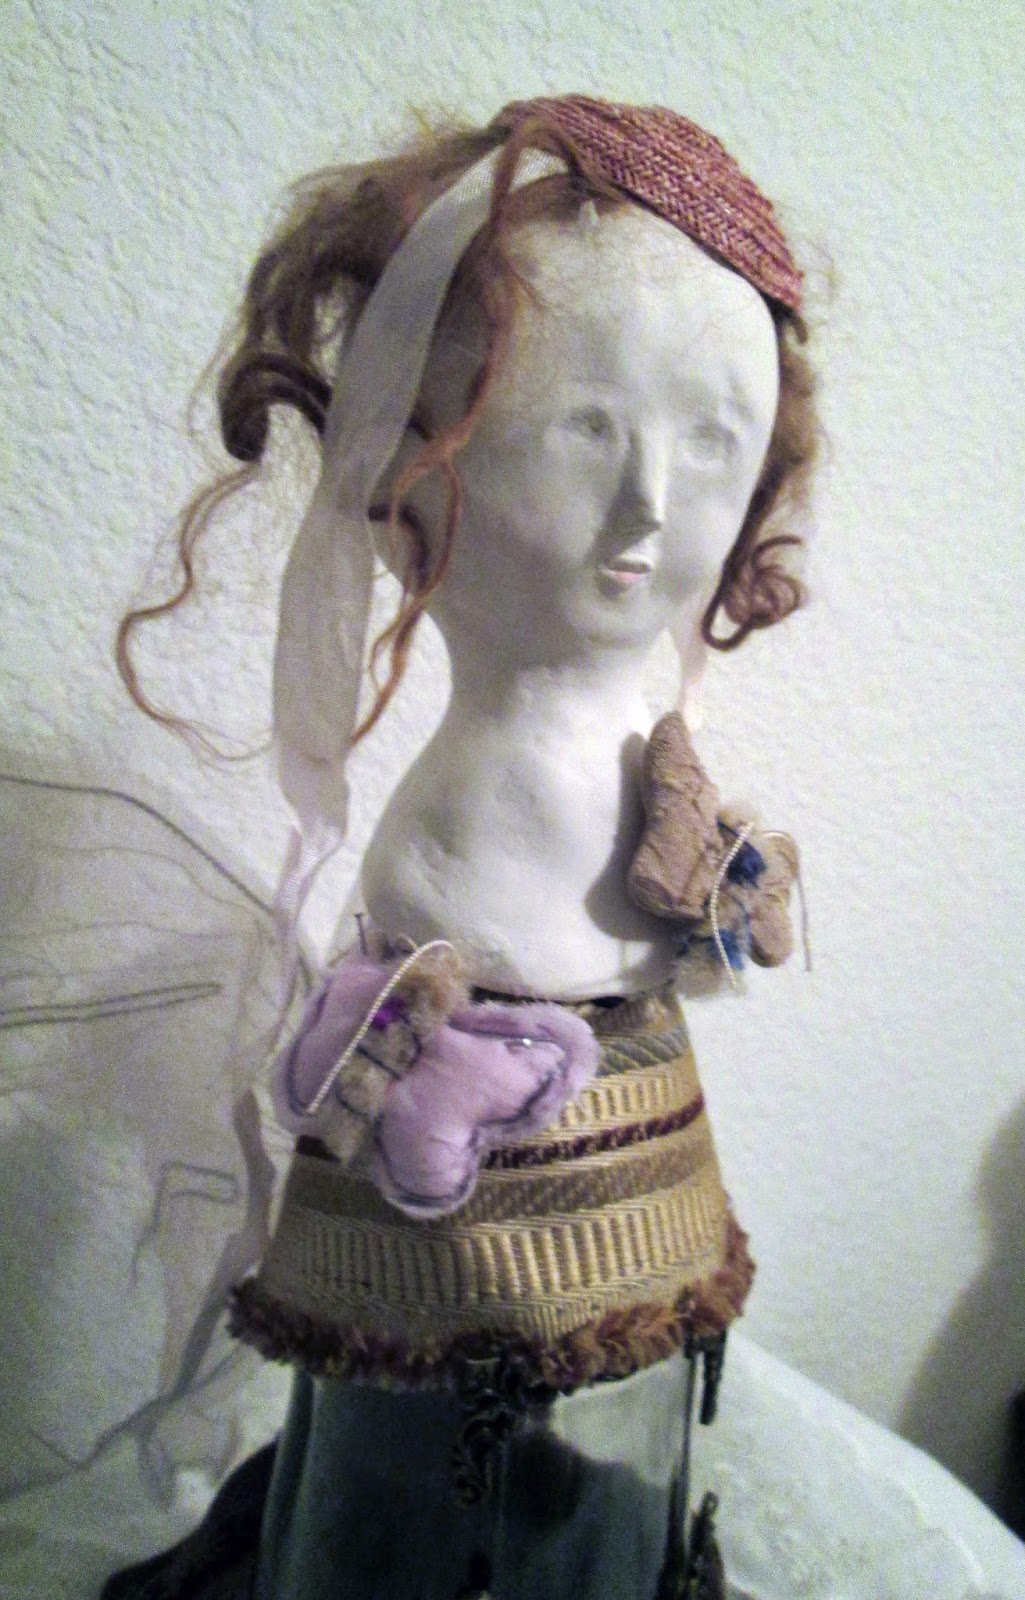
Ok, so I started the doll by sculpting a head, and breastplate, which fit over the neck of a long bottle...
And I cut out some geranium leaves.  I might have to darken those leaves somehow. 

The idea with the geranium is that it provides shade, inside the bottle.  I have noticed that moths really like geraniums in summer, and often fly out of them when I water.  That is, even if they haven't been able to eat the leaves, they like the shade in them later, when they are moths.

Ok that's a lot of backstory, I guess, on my observations about moths; but there's more.  Virginia Woolf wanted to write a novel called "The Moths" and refers to it often in her later diaries, but she later changed it to "The Pargiters"  (The stone-masons).  She never finished the novel.

Also, moths were studied in the 1800s by entymologists ("Moth-fanciers"), because in their change from one form to an entirely different one, moths and butterflies were thought to contain possibly a secret key, to life.....  

Although I have interesting whatnot to refer to about moths, and like them, the doll is going to be about my personal stuff..... transposed (metamorphozed?) into a piece of art.  I hope.

I continued by festooning her with moths, but now I can't figure out whether the moths should be paper, or cloth.  


I made the moths using fake fur with trim wrapped around it, and fabric.  Their antennae are made of silk fringe from a very old piano shawl.  The fabric moths are only about an inch wide.  The paper moths (directly above) are from vintage collage sheets. They are more realistic, but also more cartoony, in their way.  They don't have the softness and texture of fabric.

So much to consider, with an art doll.  Having decided what the idea behind the doll is, I have to find a somehow pleasing way to represent it.... I think if I can decide which moth to use, fabric or paper, that will help me "moth along" on this doll....

Saturday, March 22, 2014

Starting an Art Doll

I was inspired to cut some leaves of felt.... they are supposed to look like geranium leaves.  


How it happened was, I got the idea for a bottle doll having a geranium inside of it  -- so I went outside to make a sketch of the leaves of my favorite plant, a Bevan's geranium.  I also studied how the leaves grow, out of the rhizome. 


So, after cutting out 
 the leaves, I feel I am getting somewhere with my art-doll concept.... in the very first stages, now with bits and pieces.... and some hair draped around.  


Sunday, March 9, 2014

Alabama Baby - Finished

 Well, after sewing on the hooks in the back of the dress, she or he is done.  Here are pictures of my completed Alabama Baby doll, made for the Maida Dolls Group challenge.

I used my own pattern for the doll's body.  


The doll is about 18" long, the face painted simply with acrylics.  The head is entirely hand-sculpted by me.  I started by doing a very different sculpt, but when I saw my error, sawed the sides off, and filled in the eyes.

 She is dressed in plain cotton ticking.   I liked doing a fancier dress in the ticking, though, with ruffles.  It was my first time putting stockinette on a head, too, and it wasn't too too hard, but I have to admit there are a few seams in back.  

I noticed about stockinette is that is does take antiquing well.  It's much more of a "surface."

Was fun doing this doll!  Maybe more are in the future.


Tuesday, February 4, 2014

Googly Goes "Back East"

In late December, I finished another one of my interpretations of a Googly doll.  She has flyaway hair, as you can see and is dressed in her scoot-around dress, with a book bag. 


 Pictures can be clicked on for a larger view.

I made her for a trade with Artis Corwin, a talented dollmaker whose work can be seen on the Maida site.  I used my own patterns for the clothing.  Above is the Googly walking on her way to school, maybe passing by a dog.   I like Googlies for their various expressions....

Below she is in her other outfit, her school uniform.  I pleated the skirt so the green is on the inside pleats, and gave it a little pin as I remember my tartan skirt had one when I was in the sixth grade.

Her little bag and shoes I made of leather.  I used Gail Wilson's pattern for the shoesies. 


I made the teeniest shirt I have ever made.

It was fun to do a doll trade with Artis.  

Monday, December 30, 2013

Some Progress on the Alabama Baby Doll


A sculpted Baby new year: this is the doll I am working on for the Alabama Baby Challenge for the Maida group.

I changed her eyes from my original sculpt, made her head more rectangular, and when I added fabric to her, put a seam at the top, as is shown in some of the photos of the antique dolls.  It looks a little Frankensteinish, but oh well, how can you get the first sculpt totally right.  It's to learn.

I kept seeing more things, the more photos I looked at.  The main thing was the eyes; they have no lids, they are sort of like triangles.... and so many variations in head shape among the photos I looked at. 

But be that as it may, I came up with this, and am now making a body pattern. 

I like dolls in this stage; when I have decided on them.  I feel some relief that I have decided in some corner of my mind; saying okay, move forward. Although I kind of wish I had just started over, rather than changing the sculpt I did originally!

Happy New Year!


Thursday, December 19, 2013

Alabama Baby Challenge

There is a challenge going on at the Maida dolls group, to make an "Alabama baby" doll.  This was billed as an "indestructable" doll, made from around 1905 to the early thirties. 

 Image  from Theriault's - hope they don't mind


I looked at several of the doll photos online, and was all set to go....I sculpted a head using Paperclay, trying to get her little turned up nose
and the jowly cheeks; but I didn't have a firm grasp of the eyes...or the mouth...
 so I ended up sculpting them more like this:

Image from Skinner auction site.  This is a Philadelphia Baby!


My sculpt

 So I have to change her face later, if I am to call her an Alabama Baby doll....

Hope everyone is having a good Holidays.


Saturday, December 7, 2013

New Googly Available

This Googly is now available for sale on Etsy..... she is twelve inches long, and comes with all her clothing pictured.  She seemed to like pink so much, I gave her as much pink as I could.  Her wig is made of human hair, and all her clothing is handmade. 


The dress is cotton with vintage old stock crepe du chine sleeves.  Her underthings are of the same crepe du chine.  For her dress and hat trim I found old matching ribbon.  Her shoes are made of leather with tiny bows. 

Her hair can be styled, combed, even washed or wetted to take curlers.  I could not think of a name for her yet, but am calling her "Pinky."  I think she has some of that Googly childish yet somewhat adventuresome charm.  Her face is made from a mold I took of my own sculpt.  I painted her in acrylics.  I do enjoy making these dolls.  

Note to Maida members:  If you are interested in this doll, I am offering a discount to Maida members.  Please contact me through this site or through Maida, and I will adjust the Etsy price.  


Saturday, September 28, 2013

A Pink Googly

Here is another "Googly" doll, that I just finished!

She is my interpretation of a Googly doll.


I hand-sculpted the original head in Paperclay.  The clothing is all handmade by me.  There is old-stock garter trim on her dress.  The sleeves (and her "knickers") are made of old-stock crepe-du-chine fabric  from the 1930s.  I made her hat from new hat-straw, and handmade her booties and wig.  The photo above was taken with the stand underneath, which distorted her dress. 

She took many months, because I worked on making a pattern for her dress, tried to get the wig just right, and the summer was so busy.

Here's her pigtail look, using new ribbon for hair ties:


Thank you for taking a peek.  


Friday, September 6, 2013

Sequins and Binky

I've been working on Binky, a doll for the Art Doll Quarterly circus challenge, and painted his face the other night.


It's been quite a process trying to find him the "right" hat.   You don't want the hat to compete with the eyes.  The scale of decoration on the hat has to be the right size.  And, it all has to co-ordinate; but not too much, because after all, it's a clown.  So you have to throw out the rules there, too.  After trying the pompoms (I have bought way too many pompoms) above, I tried for a smaller "dot," and tried metal sequins.  I ripped sequins off of some new, outrageous hologram-sequinned fabric.  These sequins flash every shade of color there is, changing with the light. 

I wondered how did they sew all those sequins on the net? 


This gave me a neat piece of netting, with sequins falling off of it.  Love making new things look tattered. 


I swear it seemed that Binky was getting excited over the sequins too ....


There are more decisions to make about his costume.   But, he might end up with a sequined hat.  I think he is hoping for one!


Monday, September 2, 2013

Changing My Mind

I have been busy making a circus-themed doll, for the Art Doll Quarterly magazine circus doll challenge.  The deadline is September 15.


I sculpted the doll over a cloth body, along with three dogs, in Paperclay.  She was to hold rings for them to jump through.  I was going to crackle and antique the dogs, and was calling them in my mind the "crackle dogs"... "Snap, Crackle and Pop."  The one going through the ring is Pop. 


I liked the dogs, and the doll; but after getting most of the project done, except for hemming everything, I had to admit:  the doll's face wasn't very cheery, for a circus. 

I often, when a project is almost done, go off on a tangent or something, and try something else.  

So, I decided to try
a different doll, using a head that I sculpted a few months ago.  Here is a work-in-progress picture, below. 


I made his hat by stretching felt around a finial, securing it with a rubber band, pulling the felt very tight and then painting it with diluted Elmer's Glue.  Then let dry.

Tentative name... Binky.  or maybe Emile.  I think it's important to feel cheered when you look at your work, and he makes me feel happier.  Hopefully I can get him and the dogs done by the mailing deadline. 


Related Posts Plugin for WordPress, Blogger...